How to Choose a Meat Grinder: A Plain-English Buying Guide
Recommended picks


Wattage: The Number That Matters Most
Wattage determines how much resistance a grinder can push through before the motor bogs down. At 800W, the Sunmile SM-G35 ($46.99, rated 4.4 stars across 2,900 reviews) handles typical home batches of chicken, beef and pork without trouble. Stepping to 1000W, as in the Sunmile SM-G73 ($79.99, 4.4 stars, 796 reviews), gives you more headroom when meat is cold or partially frozen. Peak-wattage figures printed on some budget grinders refer to surge draw, not sustained output, so compare sustained ratings where the spec is available. If you plan to grind gristle-heavy cuts like pork shoulder or wild game quarters, treat 1500W as the minimum. Going higher costs more and adds weight, so only buy the power you will realistically use.
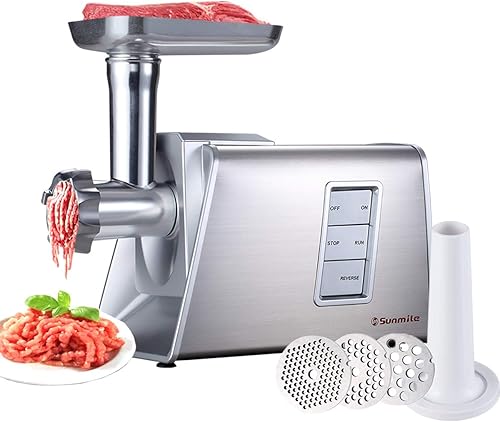
Grind Plates and Stuffing Tubes
Every meat grinder ships with at least a coarse and a fine plate. The coarse plate (around 8mm holes) suits burger patties and meatloaf where you want texture. The fine plate (around 4.5mm) works for hot dogs, liverwurst and any application where you want a smoother, more emulsified grind. Most mid-range home grinders include two or three plates plus a sausage stuffing tube, which is enough for most cooks. Check that replacement plates are available for the model you choose, because plates dull over time and need replacing every year or two with regular use. Stainless steel plates outlast aluminum and are worth the small price premium.
Hopper Capacity and Throughput
Hopper capacity tells you how much raw meat you can stage above the auger at one time, while throughput is how many pounds the machine processes per hour. These two numbers together determine whether you will be constantly re-loading or grinding comfortably. The Aaobosi MG102A ($109.97, 4.5 stars, 1,681 reviews) lists a 3-pound hopper, which means frequent refills for larger batches but stays compact on the counter. For hunters processing a whole deer after a hunt, a commercial-style grinder with a hopper holding 14 pounds or more makes a session far less tedious. Casual home cooks grinding a pound or two of burger at a time will never feel limited by a 3-pound hopper.
Construction: Plastic Body vs. Metal Internals
The outer housing being plastic is not a problem, but the parts that touch food and bear load should be metal. Look specifically for a stainless steel cutting blade, steel grind plates and an aluminum or stainless auger. Plastic augers wear down and can introduce fine particles into your ground meat over time. The head and throat that accept the pusher should feel solid with no flex when you apply light side pressure. Weight is a rough proxy here: a machine under 5 pounds is almost certainly plastic-heavy throughout, while a grinder in the 7 to 15-pound range usually has meaningful metal content in the grinding assembly.
Safety Features Worth Checking
A reverse function is the single most useful safety feature on a home meat grinder. When sinew or connective tissue wraps around the auger and jams the machine, you can back it out instead of disassembling the head. Most machines at $80 and above include reverse. A circuit breaker or thermal overload protection shuts the motor off automatically if it overheats rather than burning it out, and is standard on most grinders above $50. Beyond those two, look for a food pusher or stomper included in the box so you never need to press meat toward the auger with your fingers.
Cleaning and Maintenance
Most home grinders should be disassembled and hand-washed after every use. Fat and meat residue left in the auger channel spoils quickly and creates food-safety risk. Check whether the head and plates detach tool-free: a quarter-turn collar or simple twist-off throat makes cleanup take minutes instead of a chore. The cutting blade is sharp on both sides, so dry it with a folded towel rather than running your fingers along the edge. Reassemble while parts are still slightly damp and dry further in place to prevent rust on carbon-steel components. Once a month, a drop of food-grade mineral oil on the auger shaft keeps it moving freely.
Common mistakes to avoid
- Buying on peak wattage claims instead of confirmed sustained motor wattage, which leads to a grinder that overheats halfway through a batch.
- Ignoring the weight of the machine: very light grinders (under 5 lb) almost always have plastic internals that wear fast.
- Skipping the reverse function to save $15 to $20, then having to disassemble a jammed auger every time sinew gets caught.
- Choosing a hopper that is too small for typical batch size, which turns a 10-minute job into a 40-minute chore of constant reloading.
- Not verifying that replacement grind plates are available for the model before buying, since proprietary sizes can be hard to source.
- Running warm or room-temperature meat through the grinder instead of chilling cuts to near-freezing first, which causes smearing and motor strain regardless of wattage.
Frequently asked questions
How much wattage do I need for grinding deer or elk?
Wild game tends to have tougher connective tissue and less natural fat than beef, which puts more load on the motor. Plan on at least 1000W for occasional use with lean venison, and 1500W or more if you process whole animals in a single session. Running a lower-wattage machine on game is the fastest way to trigger the thermal cutoff or wear out the motor early.
Can I grind partially frozen meat?
Yes, and it actually helps. Meat that is firm but not fully frozen (around 28 to 32 degrees F) holds its shape as it enters the auger, which produces cleaner cuts and less smearing. Fully frozen meat is too hard and risks stalling the motor. Let very hard frozen meat thaw in the refrigerator until it gives slightly when pressed before grinding.
What is the difference between a #5, #8 and #12 grinder?
These numbers refer to the head size, which determines how wide the grinding plates and throat opening are. A #5 is compact and best for light home use up to around 3 to 5 pounds at a time. A #8 is the most common home size, balancing throughput with counter footprint. A #12 is semi-commercial and suits hunters or anyone processing large quantities regularly.
Are meat grinder attachments for stand mixers as good as standalone units?
Stand mixer attachments work fine for grinding small amounts of boneless chicken or beef a few times a month. They are limited by the stand mixer's motor, which is not designed for sustained grinding resistance, so throughput is slow and the motor can heat up on longer sessions. A dedicated electric grinder with a purpose-built motor will outperform any attachment for batch sizes above 2 to 3 pounds or for tougher cuts.
How do I keep the grinder from smearing the meat instead of cutting it?
Smearing happens when the blade is dull or when meat is too warm. Replace the cutting blade at the first sign of the output looking paste-like rather than textured. Always chill the meat and the grinder head parts (auger, blade, plates) in the freezer for 20 to 30 minutes before you start. A sharp blade moving through cold, firm meat shears cleanly and produces the defined texture most recipes call for.